Quantcast
Channel: A Sewing Life

Simplicity 1887: Slouchy Silk Trousers

$
0
0
The jury is still out: will I actually wear "silky track pants"? Not sure, but I do like them!

I pretty much rely on the website You Look Fab for information on what is current in fashion. I don't say I necessarily act on this information, but Angie does a tremendous job of covering trends and helping women to think about whether and how they might incorporate different looks into their wardrobes. Even though I am not conscious of trying to follow trends and I don't buy ready-made clothing, I know that Angie's influence is at work in my sewing. Her posts Two Ways to Wear Silky Track Pants and The Skinny on Baggy and Slouchy Trousers are undoubtedly what got me thinking about this style of pants.


This isn't a new trend, but it seems to have picked up a lot of steam this year, with lots and lots of slouchy pants available online (and, presumably, in stores). The versions below are from Eileen Fisher via Nordstrom's website. From the customer reviews, the first pair have been very popular. I like all of these pants and fabrics but, while I think Eileen Fisher's prices are very fair for the quality, they are expensive--around $250 per pair.

Simplicity 1887 has been in print for three or four years, but I hadn't noticed it until this spring. If the style appeals to you, it's a good value, with shorts, a skirt and pants included.


The style has front pleats, a curved flat front waistband and a partial-elastic band. The pockets are very nicely drafted: they are large enough to be useful and they do not gape. Although I don't think the instructions mentioned this, I stabilized the pocket edge with 1/4" cotton woven twill tape for durability and to guard against sagging.


The elastic at the pant hemline turned out pretty cute, I think! Strangely enough, I did not shorten the length at all. I am 5'2", and these could maybe use to be 1/2" shorter, but not more. If you are taller than me and want a full-length pant, you will need to add to the hem before cutting out.

If I make these again, I need to increase the waistband by at least an inch. I had read that the pants were really oversized, so I made the size 10. I like the fit overall, but getting them over my hips is a real struggle! Once they are up, they are incredibly comfortable. Unfortunately, pants do need to go up and down over the course of the day.


The fabric is navy silk crepe de chine from FabricMart Fabrics, purchased some time last year. Two and a half yards of this 54" wide silk made this pair of pants plus another SBCC Mimosa top (just completed yesterday). Since the silk was on 30% off sale when I bought it, it was $7/yard. The pants therefore cost about $10.50 in fabric, $0.99 for the pattern and about $3.00 for two yards of 5/8" elastic, or under $15. Quite a bit less than the Eileen Fisher version, and very luxurious-feeling to wear. 


15 Years Ago Today

$
0
0

15 years ago today, I married my wonderful Eric, in a dress I made myself, on the lawn outside my mother's house.

I was so happy that day. And I am so happy now, for all that the day followed and led to.


New Look 6143 Dress

$
0
0
Somehow I've never managed to make a successful version of this basic dress shape: darted bodice, sleeveless, full skirt. 

It's not totally been for lack of trying, but summoning the will to follow the fitting process all the way to a successful conclusion has taken some time.


I have to consider this dress a wearable muslin even yet. This cotton fabric--I really love the print--was originally a duvet cover, and I just have to think it is from the 1940's. I bought the cover for $3 at a Habitat for Humanity thrift store, which seemed like an amazing deal until I realized just how damaged, fragile and off-grain the cotton had become through its many years of service. Aligning all of the motifs wasn't going to be possible due to the warping of the fabric, so I decided to focus on lining up the center front and center back matches across the bodice to the skirt and to not worry about the side seams.

There is a discolored area on the lower front skirt piece. It was impossible to cut a front skirt portion in one piece without damage so I just had to accept that.


The background of the fabric is uncomfortably close to the color of my skin, so the dress looks much cuter with this short-sleeved cropped cardigan than without.


Fitting this dress was motivated by the notion of making one of the versions with the inset yoke and sweetheart neckline. I reasoned that I should work out the fit on the solid bodice pieces and then apply those changes to the yoked bodice pieces--but I haven't gotten that far yet. Just resolving the simplified bodice took three muslins: two unwearable, and this one.


Quite a few New Look patterns (including this one) start at a size 10, which I don't like, knowing that I will be needing to narrow the upper chest width at that size. But working through the fitting of this bodice, I realized that it hardly matters, since I would also need to narrow the size 6 or 8, though less. Now I think that starting with the 10 probably made the upper torso length and depth more appropriate than the 6 or 8 would have been.


So, what did I change? Here's your list:

  • Narrowed the back and front upper chest width 1" per side (total of 2"!) using the method I've shown here on the blog
  • Lowered the front neckline 1 1/4"
  • Made a small FBA of about 3/8" (muslin number one had no FBA, muslin number two had a larger FBA and muslin number 3--this one--had a just-right FBA)
  • Curved the bottom dart to take up a bit more fabric under the bust
  • Shortened the bodice 3/4" at the waist line
  • Made a 1" swayback adjustment to eliminate pooling at the small of the back. The back pattern piece looks truly bizarre with its radical curves to match my back!
  • Graded out to a size 12 at the waistline


Using the instructions from one of my very favorite sewing reference books, Claire Shaeffer's The Complete Book of Sewing Shortcuts, I fully lined the bodice by machine using self-fabric. She provides instructions for sewing the lining without turning the bodice through the straps, which would be quite a struggle with straps as narrow as these.

And to say a little more about this book: it is out of print, but there seem to be a number of used copies available through Amazon for the price of shipping ($3.99). The title is completely erroneous: the content of the book isn't about sewing shortcuts at all. Rather, Shaeffer provides a variety of methods for performing different sewing operations, allowing the intermediate or advanced sewer to choose the method that best suits her preferences or the needs of the particular project. There are no photographs, but the instructions are clear and concise and the basic line drawings help clarify the steps. I find this book much more useful in general sewing than the other, more lavishly photographed and printed, Shaeffer titles on my shelf (High Fashion Sewing Secrets and Bridal Couture, though I do like those and use them occasionally).

By the way, the pattern instructions show finishing the neck and armhole edges with bias binding.

I used the skirt from McCall's 6503, on the grounds that the pattern tissue was all cut out and I liked the way the pleats are arranged. But now I want to try the actual skirt for this dress, as I'm not too fond of the way the pleats are sticking out over my backside. Will report back!

I realize that this dress is not earth-shatteringly gorgeous or unique, but I am pretty excited about it all the same. I have never had a dress like this, since RTW versions of this style all gape and fall off my shoulders. It's not the fault of those dresses or their designers--it's the result of my narrow upper chest. My wedding dress, which I showed in the previous post, is a sleeveless dress with straps that required similar adjustments, but it is an empire-waisted style.

This style should be useful for creating basic dresses that pair well with cardigans. When I try to make a version with sleeves, I will add some width to the shoulder line, as I think it is too cut-in to accommodate a sleeve as it is now.

The great thing about a simple sleeveless dress is that I can shed the cardigan for hot summer evening dances. Then I will be cool and securely covered!

Better With Bernina? I Got A 1090S

$
0
0
Friends, I am fickle.

Fickle, fickle, fickle.

My constant is a love of sewing machines and a deep curiosity about their different forms. But my sewing partners--well, I love them all for different reasons, but I am not "in love" with them forever. I'm not sure whether I even want a committed, long-term relationship.

I've been playing the field--by which I mean scanning Craigslist--for a while now. Yes, I was looking for trouble, and I found it.


As a form of talk therapy, I want to tell you about my history with Bernina.

I first started sewing as an adult, when I had moved from North Carolina to Boston with my boyfriend (now husband). Right before I left the nest, my father produced a vintage Kenmore sewing machine from the 1970's from his vast horde of goods. That machine is now long gone and I don't know exactly which model it was, but it was a capable machine. Though my parents both sewed, I learned from books (because that's how people in my family did things, pre-internet). And I merrily made lots of skirts, jackets and dresses for my corporate jobs.

Along came plans to get married. I briefly shopped for wedding dresses, but I couldn't get into parsing the different options, pros and cons of what was available in ready to wear, so I decided to just jump right in to making my dress. I asked my mother if I could borrow her Bernina, a 1000S, and she dutifully packed up the machine and sent it off to me.

What a revelation! I loved that machine, and my sewing became instantly and magically much more precise and easier. Without that pretty Bernina, my wedding-dress-making adventure might have ended before it got properly started and I might have bought something off the rack after all. In retrospect I could have saved myself a lot of aggravation and expense if I had just secretly kept that machine and told my mother that it got lost in shipping or stolen from my house or some other dire fate.

Instead, I packed it back up and shipped it home to North Carolina after my honeymoon, and soon I found myself at a Bernina dealership in the Boston suburbs being talked into a newer, more feature-laden, more sophisticated, more expensive machine, the Virtuousa 160. What a ridiculous name, by the way.

I had big plans for my new 160--but two life events interfered. First, I unexpectedly got a new and very demanding job. Second, I got pregnant. Event #2 trumped event #1 when I became the mother of an extremely high-maintenance baby. Colicky is just not the right word. Not much sewing happened until my son started school (and then stopped school and started homeschool, but that's another story).

By the time I got around to using my 160 in any major way, I discovered that I really didn't love it as much as I had expected. And then the motherboard went out. And then the local dealership displeased me with their attitude. So I just felt mad that this Bernina, which was supposed to be the end-all and be-all of sewing machines, hadn't lived up to my expectations.

So I sold it on eBay. After it was repaired, that is! And I used the proceeds (plus some extra funds) to buy a Juki F600, which I have enjoyed very much.

And yet, there were things I missed about the Berninas: 1. The thing everyone talks about: the amazing, wondrous presser feet, especially the #10 edgestitch foot and the #35 invisible zipper foot; 2. The small diameter of the free arm; 3. The quality of the stitch. I can look at a garment and tell whether I sewed it on my old Bernina or on another machine. And I recognize that no one but me can see this or will care, but still, I do see it and I do care.

So I've been following Craigslist and eBay, and the prices the vintage Bernina 830 and 930 Record machines command are daunting. A beautiful, very complete 930 came up on our local Craigslist, and I certainly considered it, but it was $900. The 830s were manufactured from 1972 through 1977, so they are now between 36 and 42 years old. The 930s date from 1978 to 1989, now between 25 and 36 years old. Based on my experience with a nine-year-old Bernina needing a new circuit board, I felt worried about investing so much in a machine of this age, especially since Bernina is no longer manufacturing the boards.

And then this 1090S came along. The feature set is perfect for me--just enough electronics to satisfy my longings, but not too many. It has the heel-tap for needle-up or needle-down on the foot control, which my 160 did not and which I love. It has the extra-long basting stitch, which the 160 did not have and which I am hesitant to try (because the machines can get jammed in this position if the basting stitch has not been used in a long time and require service to unstick). It has the continuous-reverse stitching feature which the 160 did have and the Juki did not, and which is wonderful for darning.

The 1090S came with everything--case, manual, knee lifter, extension table, all original attachments--and it is in gorgeous condition. Sews wonderfully. The only things I don't love so far are those dated graphics (the pastel swoosh on the front) and the not-terribly bright light. The light is easily addressed, since I have a great LED gooseneck sewing light mounted to my sewing surface (the Reliable Uber Light). For what I considered a great price on a Bernina in great condition, $440, I decided I can live with the graphics. It was manufactured in 1995, so it is 19 years old. Still vintage, but half the age of 830s going for twice the price. True, its electronics are more complex than those in the 830, so we will see how we do.

I loved the Juki's buttonholer, and I also loved how well it started off sewing without sucking the threads into the bobbin area. I will just have to miss those, because the Juki is headed to a new owner off in California as I type.

Bye, Juki! It was fun!

Another thing I've noticed is that the Bernina does shake the sewing table more than the Juki--maybe a function of the weight of the machine, maybe the difference between the rotary horizontal hook of the Juki vs. the vertical oscillating hook of the Bernina. Might need to rethink my sewing surface!

So, it's being very fun to play with a new toy. Hope I don't live to regret the change, but so far I'm good with it.


Lacy Butterick 5925 Tunic

$
0
0

From the black hole which has been my summer emerges a lacy white tunic top! As bloggers say, I've been sewing but not photographing and consequently not blogging. I plan to wear this top to my stepfather's 75th birthday celebration on Sunday, and I hope to have some photos of the top on me from that day. But I decided to strike while the iron was hot and go ahead and show this top now, modeled photos be damned!


I have made this Butterick 5925 Katherine Tilton top once before, that time in a limp black rayon jersey which didn't survive long. The top was very comfortable and served its purpose as a muslin and short-lived pullover. 

This one is a combination of views A and C: the back and sides from view A, minus pockets, with the front of view C, but cut on the fold rather than with a center front seam. 

Side view, showing curved points and raised front hem
The pointy lower edges were rounded off after the top was assembled, allowing me to attach a ruffled strip continuously around the lower edge. I cut this strip on the lengthwise grain (it had a better edge for rolled hemming on the lengthwise rather than the crosswise grain, and both were quite stretchy), finished the edge with a serger rolled hem, gathered it slightly and attached it to the bottom of the top.

Back view, showing curved pieced back panels
I reduced the length of the sleeves by six inches and finished them with the same ruffled strip as the bottom.

The neck edge is finished with a strip of the fabric selvedge, which offered a convenient fold line. It was attached to the right side of the stabilized (stay-stitched) neck edge, then folded to the wrong side of the neckline and stitched into place in the ditch.

Other than the modifications described above, this was made as size XS with no alterations for fit. It's still very roomy. To my mind, the design needs either a fluid fabric or, as in this case, a sheer one. Otherwise it risks drowning a short figure. The way the side back panels curve around to the lower front is very cool, but it does cause the top to stick out in front, which could easily be frumpy in a more substantial fabric.

Speaking of fabric, this came from the yard sale of a very cool friend, a wandering musician and belly dancer. It is either nylon or polyester and it soaked in OxyClean a very long time before giving up its mustiness and stains. But I do think it is so pretty, and it cost all of one dollar.

Can't wait to wear this frothy new top. I'm very much in love with ruffles right now.

Kwik Sew 2935 Birthday Shirts

$
0
0
My sweet stepfather turned 75 a few days ago, and I decided to repeat a popular past gift: a short sleeved camp shirt. How lovely that he wore his first Virginia-made shirt (from 2010, according to my note on the pattern), to his party today.

Version One of Kwik Sew 2935 in crinkle rayon

Holding up the card I stitched for him
These photos of this year's shirt don't do it justice. I took some other shots this morning while wrapping it, and then just a few minutes later my phone was, well, I don't know what it was. Hijacked? By porn vendors? My husband declared that only a complete reset would do, so the photos were lost. Here is the shirt after it had been passed around the party, and then hastily flung onto the pool table as my son was trying to drag me out the door.


The fabric is a dreamy cotton shirting from the late, great Waechter's. It was so cooperative. The main challenge of the project was matching the plaids. I think that turned out pretty well.


And here are the pictures of me wearing Butterick 5925, as promised. These photos, too, are not quite what I would like them to be, but my camera remote seems to have given up the ghost, so my husband kindly took some shots. His composition is good, but the light was so flat and gray that it's difficult to see much detail in the lace in the wide shots.

Being silly, but you can see how the back side panels wrap around to the front in this shot.


Wearing a lace camisole from Coldwater Creek underneath


And here I am just showing off one of my big pumpkins, along with my shorter haircut.


McCall's 6891 Shirt Dress in Silk Noil

$
0
0
Sewing by the numbers, checking off my "needs, wants and requirements" list:
  • Solid color
  • Pockets
  • Collar
  • Stash fabric
  • Appropriate for summer to fall transitional wear


Making up a new-to-me pattern is always more exciting than embarking on a proven winner, and I loved the collar shape of McCall's 6891. Although you wouldn't know it from the envelope of this Palmer/Pletsch pattern, the instructions note that this dress is based on a 1947 Dior design.


From the fitting perspective, I found the dress very straightforward. I compared another well-fitting darted bodice to the tissue and found the necessary changes to be fairly minimal and easy to execute. This is a size 8 in the shoulders and neck, tapering to about a size 12 at the waist and through the skirt. I shortened the bodice one inch and took a generous swayback tuck in the back.


A more significant change was reducing the flare of the skirt to fit within my three yards of 45" wide silk noil fabric. I used another pattern as a guide, which helped me to adjust the curve of the waist to match the flare of the skirt. Do you always remember that the wider the skirt, the more extreme the curve of the waist? I don't. At any rate, the skirt is much less full than as drafted--maybe as much as 25" to 30" less circumference at the hem. But I used up nearly every scrap of the fabric even so. I had to piece the inseam pockets, using a strip of the garment fabric as a facing at the edges, but switching to lining material for most of the pocket bag.


The biggest challenge of all was deciding what to do about buttons. Nothing at Hancock Fabrics was exciting me, self-covered buttons seemed too boring and I was having a terrible time picking out a button online. I wanted to try out a mixture of different vintage buttons, but I wasn't sure how to handle making different-sized buttonholes for varying sizes of buttons. Some of the ones I most wanted to use were really too big for a dress anyway. The solution was snaps sewn invisibly under the edges, with the vintage buttons applied on the outside. Wow, that was a lot of hand stitching--eight snaps on the right, eight snaps on the left, eight vintage buttons on top--at least to my mind.


I'm not positive how I feel about the buttons, but the good thing is I can change them out, since there are no buttonholes. It would be hard to make myself cut off all that hand sewing, but it wouldn't hurt the dress at all.

The only review for this pattern I found online is over at Cotton Creek Sewing--love her blog and her finished dress is gorgeous!--but she was, oh, shall we say, not a fan of the instructions for sewing the collar and facing. I consulted Claire Shaeffer's Book of Sewing Shortcuts (my enthusiasm for which I have mentioned before), which had some good points on this method of sewing collars. I took a few construction photos, but I just don't have the strength (or really the thorough knowledge) for a full tutorial. I am including the pictures, and the encouragement that I found the collar construction achievable. Just a different point of view from someone who is a booster for the convertible collar style and who would hate to see this pattern passed over entirely.

Under collar applied to bodice

Upper collar applied to facing

Inside corner detail, upper collar applied to facing, trimmed and pressed
This is actually my second version of this dress--I will show you the first just as soon as I get it hemmed and photographed.

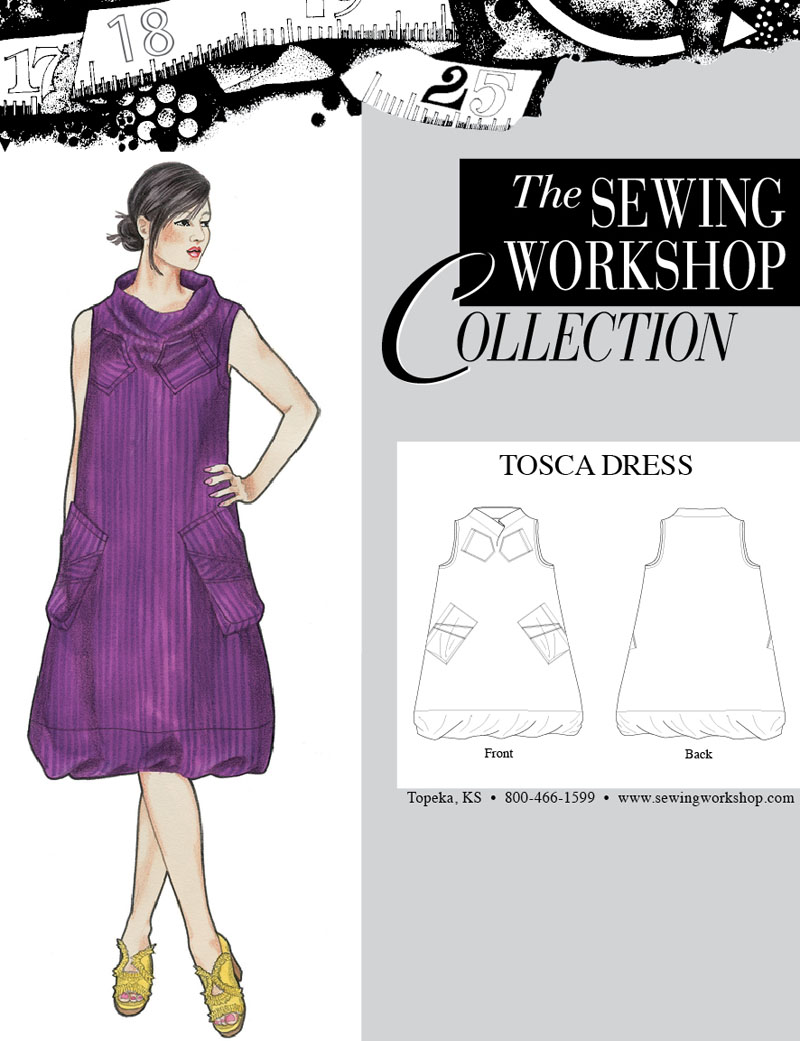
Tosca Dress from The Sewing Workshop

$
0
0

You will not be seeing this just-completed project on me for two reasons: first, because I made it for a friend and second, because it just wouldn't be fair to those nice folks at The Sewing Workshop. This dress looks so cute on my friend and so very bad on me. I amused my husband and myself by parading around the house in it last night. My friend and I are of similar size and height, so I don't know why it works so beautifully for her and so dreadfully for me, but such is the truth.


When Waechter's Silk Shop was going out of business in the spring, my friend bought their sample of this dress. She liked it so much she wanted another, so she ordered the pattern and the fabric and had me make it up.

For this version we omitted the top pockets.


Even with just the two lower pockets, it's still plenty pocket-y! The fabric is European linen in Fig from Fabric.com. I enjoyed working with the fabric--it had a nice combination of weight, drape and softness.


It's not a hard dress to make, though the pockets take a good bit of time. This is a size small at the chest and shoulders, medium through the hip to hem. I reduced the length by four inches.


My favorite part of the project is a little brooch I made for my friend to wear on the dress. The pin on the back was still drying when I wanted to take a picture, so I held it in my hand. It's a combination of needle felting, free motion stitching and a little trapunto stuffing. I think it will be cute on the dress and I did enjoy making it!


Here's Proof!

$
0
0

...of how cute the Tosca dress looks on my pixie-like friend Amie!

I also want to draw your attention to two very insightful comments on yesterday's post, in which I talked about how not-cute the dress looked on me.

First, from Steph of The Dashing Eccentric:

"What a gorgeous version of this dress! I've been a Tosca fan for years now, but haven't bought the pattern or made it up. You're tempting me!!! Lucky lucky friend :)

I see this type of comment popping up quite a bit recently. Certain shapes - a princess lined sheath, fit and flare dress, classic trousers - look great on the vast majority of people provided they're properly fitted.But there's a lot of other, interesting, unique designs which look great on some people but fall flat on many others. This often depends on subtler variations in build and proportion. This dress looks amazing on TerriK of Sew Sophisticated (she has pics on her flickr stream but i don't have time to search right now). Terri's a rectangle with a delicate build, high small bust and neat square shoulders and long, lean calves with nicely turned ankles.

Those figure types are highlighted and showcased with this design. If a person has a lower-set, fuller and more rounded bust with sloping shoulders this can start to make the top part of the dress look kind of bulky and droopy because the dress design accentuates and exaggerates that aspect of the person's form. If you have two people with the same bust measurement, but one's inches are mostly chest and less bust, while the other has a smaller chest but more in the breasts themselves you could get this type of situation (hope this makes some type of sense!).

These types of designs are wonderful to give life and style to our wardrobes, but they won't work for everyone. I adore Marcy Tilton's designs but i only look good in her V8876 dress - everything else looks terrible on me. But Marcy is a delicate rectangle, with a high small bust, whereas i'm a busty, hourglassy linebacker shouldered IT. Really, it'd be surprising if much flattered both of us with such different shapes!

But your case here shows that even subtler differences in shape can have just as dramatic a difference. I enjoy the challenge of educating my eye, but it can be so frustrating and vexing at times! 

I hope we get a picture of this wonderful piece on your friend sometime :) Happy Day! steph"

Oh, doesn't Steph just hit the nail on the head about how small differences in proportion can make architectural, sculptural designs like this one look great on one person and not great on another? And I do think Steph could wear this design magnificently herself, so make one already, Steph!! By the way, Steph's latest version of Vogue 8876 makes me think hard about finally making up this pattern for myself.

Second, the amazingly stylish Curtise of The Secondhand Years points out:

"The dress looks great, how nice of you to make it for your friend, but it would look just awful on me! As the commenter above observes, there are all sorts of differences of shape and figure which means that styles work for us or don't. As an hourglass with biggish boobs and hips, this style would disguise rather than accentuate the good things about my figure. But hey, wouldn't the world be dull if we were all the same! xxx"

Even though Curtise is shaped very differently than I am (i.e., she is a goddess), I think she's right--this dress wouldn't be a good look for her either. It would turn her statuesque curves into an undifferentiated volume of lumps!

So here's a great benefit to sewing for others: it gives us a chance to take a new idea for a spin, check it out and see if it might also work for us. As long as it works for its intended wearer, it's all good! And I do think this dress works for dear Amie, amazingly well. I'll enjoy it on her!


Liesl + Co. Cappuccino Dress Returns to Its Roots

$
0
0
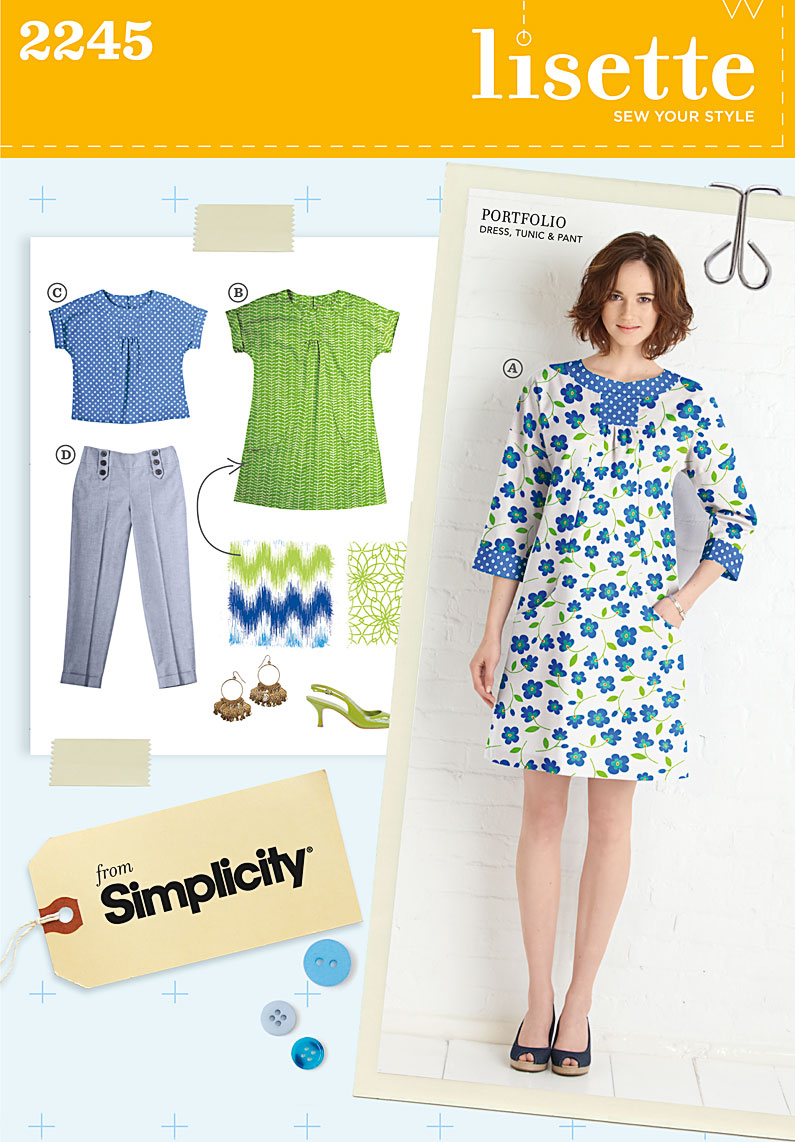
So, I understand that Simplicity 2245, the Lisette Portfolio dress designed by Liesl Gibson, is kind of a thing. After the pattern had been taken out of print, it caught fire on Pinterest and copies grew scarce. I believe they go for big money on eBay.

According to Liesl's blog, despite much customer interest and many requests, Simplicity decided not to reprint 2245. Reading a bit between the lines, I am guessing that copyright concerns prevented Liesl from reissuing the pattern in its original form under her own brand, Liesl + Co.

Original 2245

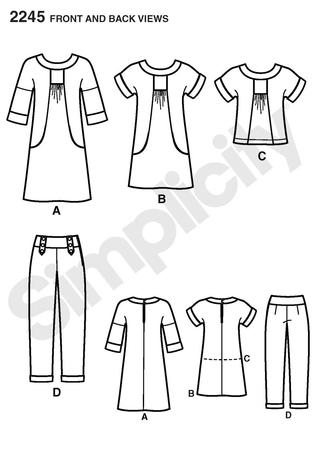
2245 Line drawing. The pants are cute too!
So Liesl + Co. reworked the design and released it in digital format as the Cappuccino Dress + Tunic.


I like the new design and I think the V neckline would probably suit me better than the original round neck. But when I showed the pattern to my friend Amie as part of our "smock project" to outfit her in comfy funky smocks, she preferred the round neck. I blithely assured her that redrafting the Cappuccino dress to return it to the original Portfolio design would be no problem.


And actually it wasn't a problem, though like all pattern drafting it did require some thinking and much studying of images of the original dress. This is a size 12, shortened 3" at the hem to hit Amie right above the knee for wearing with leggings or slim pants, over a long-sleeved t-shirt.


I'm going to show you a couple of photos of the inside of the dress, in case someone out there would like to try a similar "back to the future" adaptation of the current pattern.


The gray linen smock for Amie is actually the second version I made of the pattern. After downloading, printing (all 45-some pages!), taping together, tracing and altering the pattern, I felt a need to check it before cutting into the final fabric. Using a cotton print bought for little at FabricMart (specifically for making test garments) and a scrap of linen from Amie's Tosca Dress, I mocked up a trial version. Here it is pre-embellishment:


I brought in the side seams underneath the arms and through the bodice to see if I could make this muslin work for me, but it's still really too big for me to wear out of the house. And it is long! Not the hemline--though I shortened that six inches--but the distance to the pockets. I can hardly reach them.


Even though I couldn't see myself getting much use from this garment, I couldn't help but try to dress it up a touch, with an applique made from some very fancy Anna Maria Horner ribbon.


Now I honestly like the tunic, but the colors still look grim on me and the neckline is still too large. So I'm tracing out a smaller size at the chest and shoulders, and shortening it through the torso, and I will see how that goes. I can't imagine this shape being particularly flattering on me, but it could be so comfortable and practical for my everyday activities of writing, housekeeping, cooking and childcare. I think it would be great for winter worn over a warm turtleneck and warm leggings or pants as an upper layer to brighten things up and hold my phone and tissues. And think of the crazy possibilities for combining fabrics and trims...


For the Record: Simplicity 2148

$
0
0
 

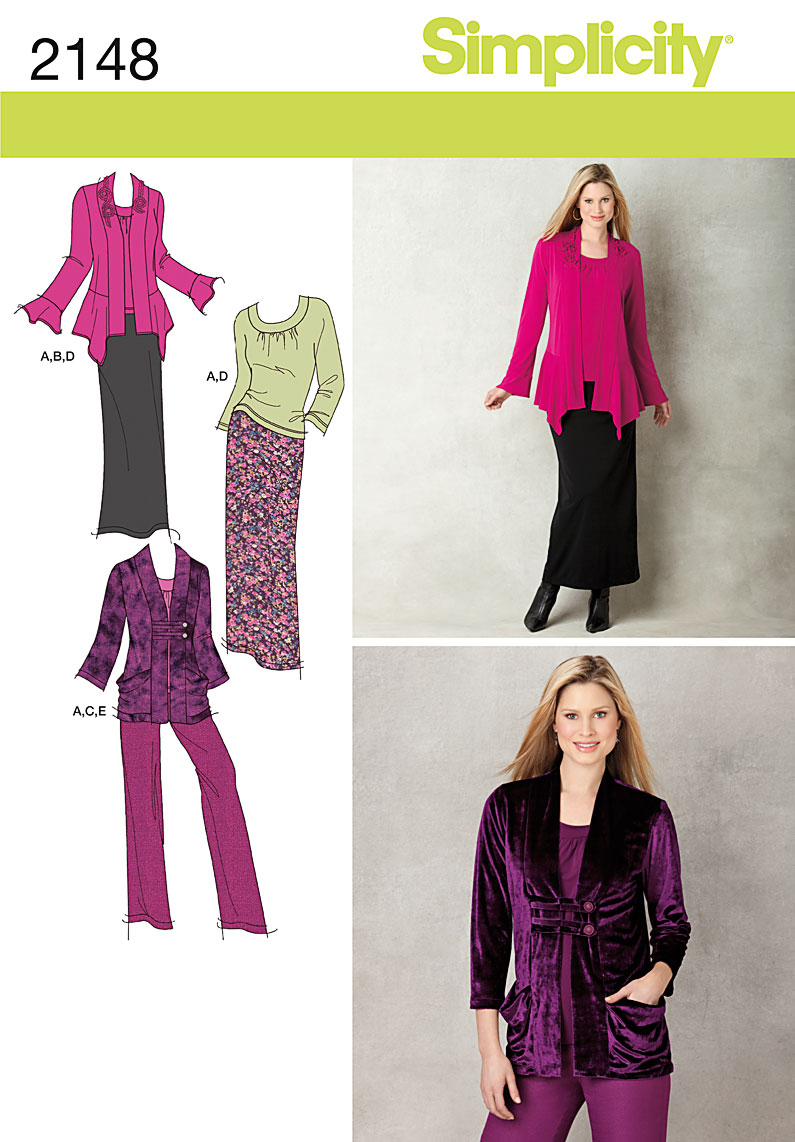
I b'lieve this pattern must be out of print now, and I'm not sure it ever took the world by storm, but  I always liked the peplum/pointy front view (now I also like the other view, minus the slouchy pockets; maybe I'll try that one soon). I made a test version and altered the pattern about three years ago and then never got around to a wearable sweater.

So I pulled this back out this year to make up a sweater for my petite mom. She doesn't like things overly long, so my previous alterations of shortening the bodice one inch and the peplum two inches were perfect for her. 


The fabric is a double-sided rayon/polyester ponte knit from FabricMart. Although it is appealingly soft and a nice color, the fabric did suffer in its prewash. It developed some faded lines (more visible on the back of the jacket) and it began to pill slightly. Good thing that this is going to my mom, since she is much easier on her clothes than me! I have a big white dog whose hair gets on everything, meaning I have to wash my clothes more frequently than I otherwise might do.

With the front flipped open, you can see the reverse side of the fabric
The hardest thing about this pattern is finishing the lower edge of the peplum. Different strategies will work better for different knits, but in this case I serged 1/2" strips of a very soft fusible interfacing to the hem, turned it up a generous 1/2", pressed in place and topstitched with a twin needle. This fabric happened to be quite cooperative with pressing and stitching. The pattern doesn't instruct you to miter the front corner, but I think that looks much better so that's what I did.

There are those lines that developed during prewashing

My mom and I both like the neckline and collar of this pattern. It isn't so much fabric that it is constantly flopping around, and the wrong sides are encased by the front band. Even though this style is probably not the most current or fashionable, I like how it hugs the neck and hangs.


The other slightly challenging aspect of the design is the inset corner at the shoulder. But the instructions are good and I didn't have much trouble making a nice sharp corner here.

The coordinating shell is Simplicity 4076.

It would be very simple to round off those dangly points in the front, and that's what I'd like to do in a sweater for myself. I like the pointy bits, but I have to confess that they might look a little dated.

My mom tried on the sweater yesterday and liked it, which was especially good since she seems to have just been diagnosed with cancer. I say "seems" because the communication with her primary care nurse practitioner has left something to be desired in terms of clarity. But we are working through the process and hope to know what she is facing soon.

Mod Top and Skirt in Cotton Interlock

$
0
0

Finally an opportunity to wear this little set, which has been complete for a few weeks now. Unprecedented: sewing in advance of the upcoming season!

Although I think it feels heavenly to wear, I've tended to avoid cotton interlock for clothing because it has essentially no recovery. Close-fitting garments made of all-cotton knits in general seem to get stretched out in a matter of minutes when they are worn (very high quality cotton knit is a different matter, but it is so difficult to find, especially in grown-up colors).

This length of teal interlock cost $2 at a yard sale, so I figured I had little to lose except my time. To minimize the sagging problem, I looked for looser fitting pieces that could benefit from a fabric with some heft. The initial idea was to make a top. Once the top was all done, quite a bit of fabric remained, so the skirt emerged from the leftovers.


Vogue 8699 is a firm favorite knit tunic of mine. This time I added two hip-level pockets, which worked out well, and I tried to add a sixties-style standup collar (like the collared version of the Tilly Coco top), which didn't.

Coco Top from Tilly and the Buttons

Maybe if I'd actually looked at the picture of the Coco top before cutting and applying the collar, I would have had a clearer notion of how to do it...

Anyway, my collar didn't stand up well, so I turned it to the inside and stitched it down. It looks kind of like a lumpy binding. Oh well. I'm fine with it. Next time I'll be a little more deliberate in my drafting.


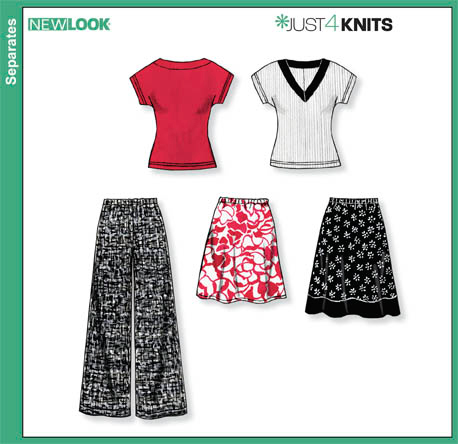
The skirt is New Look 6856, an out of print pattern that I've had hanging around for a few years. Of course it's as simple as can be, but I do like the little skirt and I can see this being a useful shape for future makes.

I hardly need to say that this outfit is as comfortable as they come. I'm off to substitute at a neighborhood elementary school, and I am happy to be wearing my new teacher outfit, which I think might get a lot of use this fall as both separates and together.

Have you made garments--successful or unsuccessful--from cotton interlock? How did they wear over time? I would love to know.

McCall's 6435 Sweetheart Knit Top

$
0
0

I may or may not have been procrastinating yesterday when I decided I "needed" a new top for the regular Tuesday evening dance.

Somehow, using scraps from other projects and a heretofore-unused pattern allowed me to justify the exercise as "frugal" rather than "distracting me from more urgent priorities."


As so often happens, the spur-of-the-moment project turned out surprisingly well (and a lot better than many more laborious recent projects have).
McCall's 6435, which is, you know what I am going to say, out of print


My major innovation (which is only an innovation when compared to the pattern) was to use a nude stretch lining under the front and back lace yoke pieces. I like to do this because I do not own a strapless bra, and don't intend to change that situation, yet I am old enough to dislike visible bra straps. On myself, that is--generally, I've come to terms with seeing all manner of colors and styles of bra straps peeking out from beneath other women's and girl's clothing.

Another benefit of underlining the lace yoke was that it allowed me to turn the serged neck edge to the inside and slip stitch it into place by hand. No binding or topstitching to make a harsh line around the opening.

I really like the way this shirt fits me, but I don't know whether to attribute that to the drafting, my clever choice of sizes or just the stretchiness of the black knit bodice. For what it's worth, I cut size 8 around the neck and shoulders, size 10 in the armscye and sleeves and size 12 through the hip and waist.

The bottom edge got a quick serger rolled hem, and the sleeve edges were trimmed around the lace motifs. All in all, a two-hour or so project, which earned some nice compliments at the dance.

Artsy Fartsy Tunic, Butterick 5925

$
0
0

Don't let my reasonably pleasant facial expression fool you. I quite hate this garment.

I don't blame Katherine Tilton for the design, or the folks at Butterick for the drafting; I just don't like this tunic on me at all.


I suppose it must be that all the drama and volume happen around the low hip. Big godets, big pockets and twisted trim. The pocket design is actually pretty nifty, as well as pretty easy to sew. But the pockets aren't much good for anything other than a tissue or a hand. I wouldn't carry anything of any weight in this pocket, as the garment is so voluminous that the pockets swing freely when the wearer moves.


I feel more like a bottom-heavy triangle in this tunic than usual. The vital statistics, for your information: size XS, sleeves shortened 1 1/4", burgundy cotton sweater knit from FabricMart Fabrics. I followed the pattern directions quite faithfully, with the exception of the points at the hemline: I mitered those, which I don't think I was instructed to do by the pattern. I left the sleeve edges unhemmed.


The neckline binding is also twisted. It's a cool detail conceptually but, again, not something I like on myself.

The heck of it is that I will probably wear this quite a bit. It's pretty soft and snuggly. But just between us, I'm not a fan of the style or the color on me.

Butterick 5954: Another Tunic (and New Look 6228 Skirt)

$
0
0
But before the tunic talk, I'm excited to say that my mom is fine! Her biopsy results came back today and there is no cancer. She was fuzzy on the exact name of the diagnosis, but it has something to do with a lymph node forming a hard, fixed cyst in some sort of an autoimmune reaction. Though I felt sure she would be okay in the end, I am so very glad that she does not need to undergo cancer treatment.

Thank you for your good wishes!

And just know that this can happen: you develop a lump in your armpit, go to the doctor, who messes around for six weeks, first telling you that you definitely have a malignant metastasis from some location in your body, refusing to do the test that you are requesting (a biopsy) until several other tests have been done and then find out that your lump is quite benign after all. I am not impressed with the care she received, to put it mildly.

Now, to our regularly scheduled tunic explorations. Here we have Butterick 5954. And I like it much better than the previous tunic I showed you. I had been trying to purchase this pattern for months, but it was always sold out during pattern sales (or it was summer). Finally snagged it though, and I am glad I persevered.


Obviously, the crossover shape is the main attraction. I decided to use this rayon/lycra knit, supposedly originally from J. Crew but bought at FabricMart, because it seemed too thin and limp for a more fitted top or dress. It falls nicely but it shows everything underneath, including the seam of the crossing-under portion of the front of the top. Good thing this top is loose!

No pockets in this one, and I can't see a good way to add them.

I remembered to check some reviews at PatternReview and online and I was glad I did. Many sewers wrote about the very large amount of flare at the bottom of the tunic and how it could give the impression of a "tail" in the back. I cut out the XS, minus at least 10" of circumference at the hem. It's something of a happy accident that the resulting fullness seems just right: not too much and not too little. From the two yards of fabric (minus some prewashing shrinkage), this was as full as I could fit onto my fabric, but I wouldn't want it fuller. I also shortened the front and back pattern pieces 1 1/2" at the printed line on the pattern, and the sleeves the same amount.


The cowl is made up per the pattern and it is a little skimpy, but there wasn't enough fabric for a deeper cowl in any case.


Here is a demonstration of the potential for flipping up, which is not inconsiderable. After taking these photos, I was out in gusty wind and I did feel the need to hold the lapping side down.


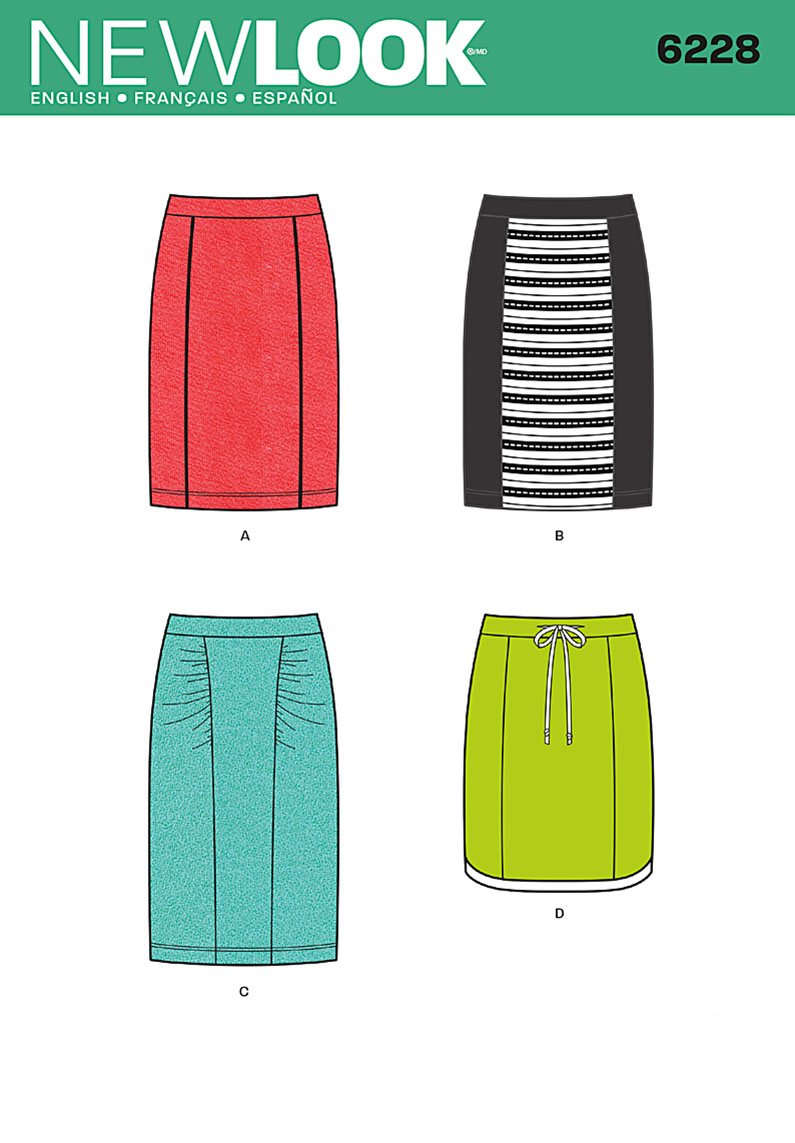
The skirt is New Look 6228, which I consider something of a ringer for the Colette Mabel. I wasn't sure whether it would be nice to even point that out, and so I was amused to find some catty sniping over at GOMI on just this topic.

Although I have made this skirt with the three panels as shown on the envelope, I didn't think they would show up in this grid print ponte. So I just used the one-piece back of the skirt for both the front and the back of the skirt. Very easy and quick.

And see, I wore a slimmer lower garment, just for you guys!

Would you like this crossover tunic, or does the potential for flashing your belly put you off it? The non-crossover view looks promising, too.


Halloween 2014: Swing Dance Wonder Woman!

$
0
0


When I was a kid, Halloween was a low-hoopla affair all the way around. The culture was less focused on the "holiday", and that was compounded for me by living in a rural area (with no hope of pedestrian trick-or-treaters). I don't remember dressing up or going house-to-house at all past the age of eight. Even when I did go, my costumes were very last-minute productions, involving a drugstore witch hat and rubber bat.

Last year my husband had a brilliant costume idea for our Halloween swing dance, and we ended up winning the costume contest. That positive reinforcement must be the new element that has resulted in my feeling much more enthusiasm for dressing up this year (though I have declared myself ineligible for the contest).

I had planned to wait until after Halloween to blog about my costume-making, but then I thought, "Wait, who cares about Halloween costumes right after Halloween?" So I decided to chat about a few of the elements of my costume, in case they are of any help to folks in the throes of their own costuming efforts.

While I am declaring myself to be a bit of a convert to costume making, I do still retain plenty of skepticism about the time, money and effort it requires. Multiple trips to Joann Fabrics, Hancock Fabrics and the local Foam & Fabrics are not my idea of the most productive way to spend my time, and yet I definitely am guilty of taking such trips over the last week.

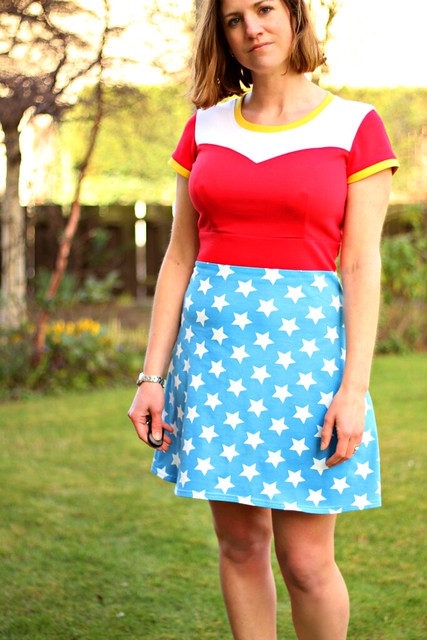
A further hangup is that any costume I wear must be reasonably modest and comfortable. No short skirts, bustiers or tragic shoes. With those parameters in mind, my costume theme is "Swing Dance Wonder Woman," an idea I must have originally gotten from this wonderful Lady Skater version by the pattern's designer, Kitchy Coo:


For my version, I combined the Lady Skater with McCall's 6435 knit sweetheart top. At first I used nude fabric for the yoke, to better mimic the strapless bustier from the TV show, but the nude fabric looked unflattering around my face, so I made another bodice with a white yoke.

For the skirt, I originally planned to order printed star fabric (like my inspiration), but then foolishly decided that I wanted my stars to be more like Wonder Woman's: spaced more densely toward the waist and then stopping before the lower edge of the garment.


I toyed with the idea of making the stars vary in size like in this version of Wonder Woman's costume. I cut out a full-size copy of the skirt in freezer paper and used templates of different-sized stars to trace the design. I planned to cut out each star with an Exacto knife, iron the freezer paper onto the fabric and stencil the all-over design in acrylic paint. With the whole skirt pattern spread out in front of me, I realized that so much cutting would put my wrist tendonitis into full-fledged uproar and scrapped that plan.

Instead, I purchased a Fiskars large star punch from Joanns. I don't know whether to praise or heckle the thing: it was invaluable for my purpose, but very temperamental and difficult to use. Halfway through the project it got too dull to punch any more stars, and I had to exchange it for another one. And yes, I did search the web for how to sharpen it and tried those tricks, but to not-good-enough effect. Anyway, I made little star cut-outs, then arranged them somewhat randomly, denser toward the waist and gradually becoming further apart toward the hem, ironed them on and stenciled. It took two coats of paint to get a nice bright white for the stars.

Fiskars XL Star Punch, here making the star for the crown

Right, so all that star nonsense took days of buying punches and doing successive coats and letting them dry...rather ridiculous.

In the meanwhile, I made the accessories. Right away I rejected the idea of copying the eagle over Wonder Woman's boobs, reasoning that, without that element, the dress can be worn on the Fourth of July or another patriotic occasion. Also, for crying out loud--too much work!

For the belt, cuffs and the crown, I found a wonderful gold-coated denim at Hancock's. That fabric was great to work with, since it has some substance to it, sews easily and isn't scratchy like so many metallic fabrics can be. I didn't do much experimenting with pressing this fabric, preferring instead to use understitching and copious amounts of double-stick adhesive tape (more on this in a moment) to hold it in place. It seemed to me that the possibility of discoloring the metal finish was high, even though the denim fabric itself could stand up to pressing.

The belt needed an adjustable closure at the back to accommodate weight fluctuations or different degrees of comfortable-ness. A simple laced back seemed to be the best solution, even though the belt was not very wide at that point. I do think it could be a little shorter, to provide a greater range of sizes, but it's fine. Also, I felt the belt would need at least a little boning in addition to its inner layer of stiff interfacing, to prevent it from folding over at the center front. It would have been just as easy to sew the channels for the boning on the inner side of the belt, and thus to have them invisible from the right side, but I decided a few lines of stitching would be more flattering on my not-tiny waist than a single unbroken expanse of shiny gold.


In general, the process for the gold accessories was to sketch a shape in my notebook, measure the area of the body where the item would sit and then draft a simple pattern.

To sew the belt, a stiff interfacing, cut to the finished size of the belt (i.e., without seam allowances) was first applied to the wrong side of the outer fabric piece. I used a fusible hair canvas, which was really too costly of a material for use in a costume, but it was the only stiff material I had on hand in a sufficiently long cut to make in one piece. After the interfacing was basted into place, I transferred the markings I had added to my paper pattern to the interfacing and sewed channels for the boning. Then I machine-stitched the top edges of the outer and inner fabrics  right sides together, and understitched the seam allowances to the back. At that point I sewed the short back edges together, then trimmed the seams and turned the belt right side out. At this point the boning was inserted into the channels, trimmed to sit inside the seam allowances at the bottom edge. In another fabric, the lower edges might have been topstitched together, but I thought that a more invisible method of joining would look better in this case.

Here was one of the many places I used and was grateful all over again for a notion that isn't widely used in the garment sewing space, Jodees's Sealah Tape. This stuff is an incredibly sticky, release-paper-backed adhesive that can be used in place of glue, hot glue or petroleum-based cements. It is amazing because it is easy to control and it bonds things instantly and permanently, with no drying time required. You do not want to stitch through it, because it will immediately gum up your needle. I like the absence of fumes and, again, the immediacy. Apply, burnish, remove the paper liner, press the surfaces together and move on to the next step.
The cuffs and crown also make use of the Sealah tape. Maybe my photos will be as useful as a lot of chit chat.


The inner layer of the cuffs is a stiff Peltex interfacing, with quilted lines 1/2" apart. Using the Sealah tape, I turned the edges of the fabric to the inside of the cuff, notching the curved edges to allow them to follow the edge smoothly. Then elastic loops were adhered to another layer of Sealah, and then the whole back side of the piece was covered with a piece of suede (recycled from a large thrift store suede jacket) using Sealah tape around the edges and craft glue (like Sobo) in the center. I did press this under a weight for a few hours to make sure all the layers would adhere together.


Eyelets or grommets would have been another solution for lacing the cuffs, but I didn't have enough of the proper size in gold, and I couldn't face another run to the store for yet another notion. I think the elastic loops will work fine and they have enough give to allow me to slip the already-laced up cuff over my arm.

I got a bit carried away with the length of the cuffs. Wonder Woman's are shorter, but I reckon I'll be able to deflect even more bullets and death rays with longer ones.


The base of the crown is a large yogurt container, cut into a crown shape and covered with the gold fabric.


In the photo above, which is a repeat from earlier in the post, you can see the small elastic loops at the back side of the crown. I will use these to mount either a comb on each side or bobby pins. The crown actually stays put pretty well on its own, because it is so very lightweight, which suits my comfort requirement perfectly!


Whew, I think I will have to finish up my description of the costume with a separate post for the boots tomorrow. I am pretty pleased with them, so I have a bit to say about how they are made, but for the moment I'm costumed completely out!

How are your costumes coming along?!!

Wonder Woman Boots With Jalie 2448

$
0
0

Of course I wanted Wonder Woman boots to go with my Wonder Woman costume, but footwear is generally the hardest part of an outfit for me and this costume was no exception.

Pretty fabulous Wonder Woman boots are available for purchase (though they don't come cheap), or one could spray paint some thrift store boots red and add some white details. Neither of those strategies appealed to me, though, because my event is a dancing event and thus it requires dance appropriate footwear (smooth soles and comfort, which are hard qualities to find in random shoes).

My goal was to make a decent approximation of a Wonder Woman boot using a pair of dance shoes I already had but NOT altering those shoes permanently. I looked around the web for ideas, which was very helpful but didn't yield this exact strategy.

At first I planned to make spats, and I went so far as to draft a pattern and to mock it up in a piece of scrap vinyl. And it became perfectly clear to me that Wonder Woman spats are not, and should not be, a thing.

Then I thought of Jalie 2448, a discontinued pattern which includes a pullover, tights and fleece socks. Even though the printed pattern is not longer available through Jalie, a PDF version of just the socks now is.


I had seen some terrifically awful shiny stretch vinyl knit at a local shop, Foam & Fabrics, so I decided to make some Wonder Woman socks to wear with my shoes.

At first I planned to wear the socks as socks, but then I had the bright idea to perhaps try to stretch them over my shoes, kind of like figure skaters sometimes wear tights over their skates to match the color of a costume.

So, I made the size which corresponded to my shoe size since I had already made these socks before in fleece (and really liked them). But because of the limited stretch of my vinyl plus wearing them over shoes, I really should have made them at least two sizes bigger. Getting the shoe/socks on is no joke, but once on they are perfectly comfortable.

I used a scrap of the heavy red swimwear fabric from the top of my dress for the bottom part of the foot because it was both stretchier and more durable than the vinyl. I altered the top of the front of the sock to come to a point in the middle, and I drafted a separate shaped facing/band to be made from a scrap of white stretch fabric.

Jalie 2448 sock pattern pieces plus added shaped band
The white stripe down the front of the boots was created with a piece of foldover elastic, and the white band at the top was from a scrap of white fabric from the dress. The back part of the band was just a crosswise strip of the white fabric cut 1 1/4" wide. Two sets of facing pieces were cut for each sock. Then each set was joined into a ring at the side seams, and the two rings placed right sides together and joined along the top edges. I used a shaped piece of stiff interfacing right in the point of the right side of the facing piece to hold the pointed shape. The band was turned right sides out, and the seam was understitched to the rear to hold everything in place for a sharp edge. Then the band was attached to the sock, pivoting at the point.


I didn't want to mess up my dance shoes, but I did want everything to be red. First I covered the heels of the shoes in no-residue medical tape (masking or painter's tape would also work).


Then I inserted the shoe into the sock and cut out the heel area.


After pulling the sock up over the heel, I used red duct tape to cover the heel and to secure the cut edges of the sock.


After my costume party, it should be possible to remove the sock, remove the duct tape, remove the lower level of medical tape and, voila, my dancing shoes will be just as they were.

The reason I think it is okay in this case to have smooth fabric as the bottom of the ball of my shoe is because I will be walking and dancing on a smooth hardwood floor. Some people actually put lycra sleeves over street shoes to make them into smooth dance shoes. Smoothness is not just okay for dance shoes, it is desirable. I actually think the heavy nylon lycra fabric used on the bottom of the socks would hold up fine to a night of trick or treating, but it would be a one-time use kind of situation.


If I were making these again (and I am kind of tempted to do another pair, since I have plenty more fabric), I would make them bigger, taller and perhaps add an invisible zipper to the inside leg seam in the ankle area. Then they would be a lot easier to get on and off and would hold up better over the long run. But then again, I'm happy with the boots as they are, too--they are comfortable and very importantly, they stay up!


I could use a spot more duct tape on the heel above, but this view shows you how it all works pretty well.

This strategy could be used for making all kinds of costume "boots" when you don't want to either buy a dedicated pair of boots or permanently alter an existing pair of shoes.

Knit Tunics: I'm Collecting 'Em

$
0
0


And here's a quick one! Another Butterick 5954, this time the un-crossed-over version. Basically a long roomy t-shirt. I need, like, about 70 of these.


Side view, showing how the hem is longer in back.


And the back view, showing all kinds of imperfections in pattern alignment/matching/sleeve fit, but my God, it is a t-shirt. What I would like for you to notice is that the center back seam allows for a lot of flare over the booty without a lot of looseness above the waist. In fact, the pattern has so very much flare that I took bunches of it out (four inches out of the center back seam at the hem, and another inch on either side seam).

I chose not to use a cowl neck on this top so that I can wear scarves with it and layer it. For the cleanest neck finish, I used a technique which is included on a few patterns I own. For this technique, you apply a neck binding in the standard way, but then you understitch the seam allowances to the binding and turn the binding completely to the wrong side. The binding is then topstitched in place close to the folded edge.


Even though this fabric, an ITY knit I just received from FabricMart, is not very sheer, I still thought the dots might show through if I used the same fabric for the neck binding. I had a little piece of white lycra knit left over from my Halloween costume, which has the additional attribute of being stretchier than the fashion fabric.


This binding technique should really be used more often, because it looks neat and it is very durable. It puts a whopping five layers of fabric into the neck edge, so it is not good for bulky or thick fabrics.

I used a narrow band to finish the cuffs. The lower edge was tricky to hem (stitches were skipping badly), so I had to use some strips of very lightweight knit fusible interfacing to stabilize and fuse the hem into place before topstitching with a twin needle.


Only 69 to go--good thing they are quick!

Wonder Woman Revealed!

$
0
0

This shot somehow makes me look a lot taller and thinner than I actually am. Any ideas how to get this effect without a camera?!

I think the Wonder Woman costume was a success. I did enjoy the gratifying phenomenon of having my friends look at me without recognizing me!

Next time, I would go for shorter cuffs with grommets. The elastic loops didn't hold up very well. Everything else performed great.

I appreciate all your cheering about the contest, but I was one of the judges and therefore ineligible. One winner was an adorable sewing friend who made herself into a letter (vintage slip with love phrases written on it) in an envelope (square tunic with airmail markings and address) worn over the slip. I hope to get a picture to share with you!

Would you believe it, I think I am going to have another opportunity to wear this costume tomorrow?

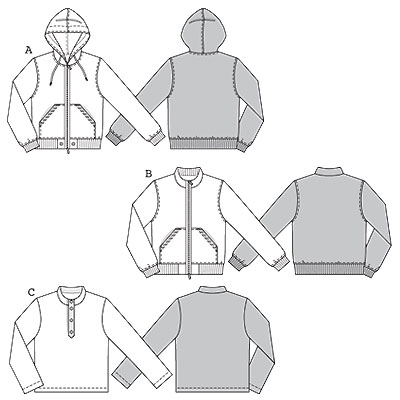
Burda 7734 Hooded Sweatshirt in Fleece

$
0
0


My son has never been a great one for posing for photos, but I think he's getting less cooperative as the birthdays go by. Here he is in his mom-made 15th birthday present, a fleece hoodie.

There might be more to say about the shopping for the supplies to make this garment than about the sewing. The Polartec fleece came from FabricMart for a great price. In addition to the main blue color, it has some faint fibers of black, which was very fortunate when it came to pairing the fleece with notions like a separating zipper, ribbed cuffs and waistband and the cord for the hood.

Real, honest-to-goodness ribbing is something I don't usually source or incorporate into my projects, but in this case it seemed that having a nice stretchy fabric with great recovery at the cuffs and hem would make the shirt much more polished and therefore more exciting to a 15 year old boy (or to my forty-something husband, if the boy turned out to not like it). I looked out a source at The Rain Shed, which is based in Oregon. They have two weights of ribbing, both of which look very nice on the website, but since my fleece is a regular weight, I went with the Standard Ribbing rather than Heavyweight. I also ordered the coordinating seamless ribbed cuffs. The quality is nice and the weight is perfect. There are quite a number of colors to choose from, but in this case black was the best choice.

The 24" separating jacket zipper and the black cord at the neck also came from The Rain Shed. I was a bit concerned about the time required for shipping, since the supplies would be traveling from coast to coast, but I ordered on Saturday morning and had my package early Monday afternoon. One thing to mention is that you cannot order directly from The Rain Shed's website: you must call in your order. The phone staff was friendly and efficient, though.


Online reviews indicated that this sweater runs small and short, so I made the next-to-largest men's size, a 42. It looked very large while I was working on it, but it seems like a pretty good fit on a rapidly-growing teenage boy.


Instead of turning a hem to the wrong side on the pocket edges, I fully lined the pocket with a thin black polyester ITY knit, which made a better edge on fleece. The pocket was turned right side out, topstitched along the angled edge, and then edgestitched into place along the top, side and bottom edges. The pattern's instructions for the zipper edge were odd to me: it asked you to turn the center front seam allowances to the outside, baste in place and trim to 1/4". The zipper tape was to be applied on top of those seam allowances, enclosing the raw edges. That might be good for a sweatshirt knit, but the fleece would have made a very bulky edge, so I applied the zipper in the "normal" way and then topstitched it.

You can't see it in these photos, but I taped the hood/neck seam edge with black twill tape, a finish I copied from an RTW hoodie.

My son is always asking me to sew more for him. He didn't have a whole lot to say about this sweater, but he's hardly taken it off since I gave it to him, so I guess that means it's a success! I hope to make him and my husband more of this style, since it is so ubiquitous and popular.

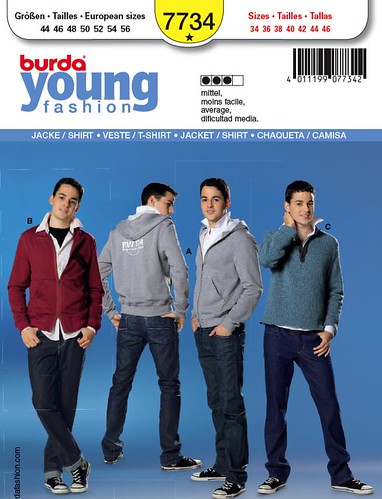
Here is the pattern, Burda 7734, which is out of print:


New Look 6298: My New Bestie

$
0
0

You know how I (and lots of other bloggers) am always like, this dress is nice, but if I had done this, or if the fabric were that, or next time I will change this? Yeah, I'm not going to say any of that stuff today! I am happy with this dress, without qualification.

I have some very, very similar patterns (including another New Look raglan top which could easily be lengthened), but I liked the pattern illustration and the general vibe of this dress so much, I went ahead and coughed up the extra $4 to have the best possible chance for success.


Normally I avoid the New Look patterns that start at size 10, as this tends to be too wide for me at the shoulder. This time I cut the 10 through the waist, tapered out to 14 at the hip through the hem, and did a 1" swayback adjustment. After putting the pieces together, the shoulder area was indeed too wide, and I took in the center back about 3/4" and back raglan sleeves 1" each--for a total reduction in shoulder width of a huge 2 3/4". But it was an easy change and everything else suited me fine. It would be possible to take in the side seams as much as 1" per side for a closer fit, but at the moment I feel satisfied with the roominess.

Could definitely be more fitted, but I like the looseness for now.
The shoulder dart worked well for me.
One reason I was eager to make a success of this version was my fondness for the fabric, a quilted polyester doubleknit from FabricMart (recent, but sold out). On the website, only the striped side of the knit was shown. I was so thrilled when it arrived to find that the "wrong" side had an adorable pattern of "x" shaped cross stitches. Both sides were so appealing that I wanted to find a fun way to use them both. The possibilities are endless, but I am happy with this combination. Wish I could get more of the fabric!


The one change I made was to the neckband. New Look included a different kind of pattern piece than the type I have seen before. Instead of a straight band seamed in the back, it was a notched pattern piece meant to be sewn together in a mitered v-shape in the front. That went together fine, but then I couldn't get it sewn onto the garment edge well. I needed two more tries to get the neckline to work out using the more common method (with a little pleat to form the vee at center front). First I used a narrower band like the pattern, just with the joining seam in the back. With the bulkiness of my double-layered fabric, though, it was just too narrow. I cut another band wider, and used a wider seam allowance. The pattern specifies 3/8" for the neckline, which would normally work great, but not in this fabric; 5/8" worked much better.

Pockets!
We all love pockets, and these are big! I didn't sew them exactly as directed--that would have made them stand away from the body slightly. I know from previous experience that I don't like that. But pinning them flat was no trouble and it worked out fine. These pockets have a stitched hem on the top edge and turned under edges on the side fronts and bottoms. The side seams are sewn into the garment side seams.

I've already made another version...in fleece! I did change the pockets in that one, since I didn't want to turn under an edge in fleece. The biggest disadvantage of the fleece version is that, once I have it on, I will not want to take it off until May. It's a slanket to end all slankets. I'll show it to you soon.

A Ruffly Hello

$
0
0
Golly, it's been a while.

One thing: Lindy Focus, the week-long camp that brings over 1,000 people to Asheville to celebrate vintage jazz music and dance. A very exciting and action-packed week builds up to New Year's Eve--which I skipped this year, due to overload and exhaustion.

I led a new project for the event this year: a real-time event blog to record and reflect on some of the event happenings. So instead of sewing new dresses for six nights of dancing this year, I led a team of bloggers and wrote and edited a whole lot of blog posts. The project made for a wonderful baptism by fire into WordPress blogging, so who knows? Perhaps I'll use my new skills in this space...though my plans are not yet clear, even to me.

Happily, the photos from Lindy Focus show a dress I never did manage to record once it was completed, the striped sweetheart ruffles dress. It's a mashup of a Simplicity 2174 bodice, self-drafted shoulder ruffles (wish I had made them wider!) and the skirt from McCall's 6503. Even though it fits in the upper bodice, it takes the lingerie guards I sewed in at the shoulders, plus a fair bit of fashion tape to keep my undergarments hidden. The fabric was from Waechter's Fine Fabrics going out of business sale. It's a rayon challis. Even though I now love the colors and the print, this design is one I know I would never have bought if it hadn't been a serious bargain.


Perhaps you remember or share my rule: no strapless bras...ever!

This is our local dance group. As I'm sure you can see, I'm on the right. FYI, I am purposely showing my vintage pink lacy slip at the hem of the dress--it's very pretty lace and I like it with the ruffly feeling of the dress.

There is one new dress in my life--which was intended for Thanksgiving--in a hilarious foodie rayon print (from FabricMart). It didn't quite make the deadline for our trip to Missouri to visit my in-laws at Thanksgiving. I surprised myself by finishing it up after we got home, all except for the hem. And there it waits for my mom to help me mark it.

This hem marking has been very much delayed by the illness and ongoing hospitalization of my dear step-father, over a month in duration so far. So, indeed, there have been things (enormous group blog projects, ill family members, other work and family activities) that have conspired against sewing, especially of the frivolous dress variety.

But I notice that there are other things I want so much to write about: my new interest in Bikram yoga (!), a natural cosmetics line I am liking, how breaking my smartphone has improved my life...and surely more. Chat soon.

And be sure to check out the bearded lady in the picture above--amazing, no? She is a makeup artist and theatrical costumer who likes to push it to the edge. And beyond.

Jalie 2563 Sport Bras, Meet Hot Yoga

$
0
0
Classic marketing research from the 1960s concluded that a prospect needs to hear about a product or service three times before making a purchase. Later research expanded that number to five times, and then seven, and so on. I can't even imagine how many times I must receive a marketing message these days before making a novel purchase or behavioral change, but it's exponentially larger than three.

Whatever that magical number, hot (or Bikram) yoga finally reached it and I decided to give it a go about four months ago. Even though I'm not fully convinced by some of the claims (notably, that sweating a lot "detoxifies" the body), I instantly loved it with all the fervor of a new convert. And you know what that meant: new sewing projects!

The joke is somewhat on me, because the answer to what one wears to hot yoga is really, "Not much." Even the most modest outfits tend to be form-fitting, because wet sweaty fabric draping around the body creates a very unpleasant sensation. After a bit of experimentation, I concluded that the ideal combination of items for me is: sports bra top or tank plus capri length athletic leggings (tight fitting, not loose or bootcut).

I also discovered that the RTW sports bras I already own (one by Moving Comfort and one by Panache) were, to my surprise, overkill for yoga. There isn't much of a need for support, since there is no jumping around whatsoever. I started out wearing my highly engineered bras with a tank top, but eventually I had to concede that these bras don't really allow for unrestricted arm and shoulder movement. They do give my breasts a more "lifted" appearance than compression bras, but I have now obtained the yogic enlightenment to decide I don't care so much about that anymore.

Jalie 2563 is a predictably wonderful starting point for all sorts of sports bra concoctions. I have now made both views in size T multiple times.

View A, lengthened to tank length with an inner shelf bra made from Powerstretch:


The main fabric is activewear knit from FabricMart, which is soft and stretchy and perfect. It looks all linty and pilled here, but this is the fault of my washing machine, which is leaving tons of lint on everything these days (any tips???).


View A made in all one color by combining the panels:


I think it makes a lot of sense to combine the panels into one front and one back piece for the inner layer of the bra top, even if you are doing the color blocking on the outer layer. Fewer seams to create bulk and potentially chafe. It would have been nice if Jalie included such an option. For similar reasons, I sewed the outer layer and the lining each as one complete bra, and then attached the two wrong sides together. This way, the shoulder and panel seams are enclosed within the layers and feel smoother against the skin.


View B, per the pattern:


Both the outer and inner layers of this bra are made from an activewear knit from Hancock's with a high percentage of lycra (I think 10%). It is nice and firm. I think this particular configuration is the most comfortable of the bras I have made, with the stipulation that I am unhappy with my foldover elastic choice. This is the 3/4" unfolded size, and it just seems too thin and delicate for the task. Everything stays in place just fine, but the scale strikes me as wrong. Unfortunately, the 1" unfolded size of FOE is very difficult to feed through lingerie sliders, even the 5/8" size. I'd love to find a better source for high quality FOE intended for binding activewear.


View B variation, tank length with inner Powerstretch bra:


Sorry for the unhemmed lower edge: I need a walking foot for my Bernina 1090 and a new twin needle before I attempt hemming a stretchy knit again.

For this variation I trimmed the back piece straight across on the upper edge.


This is the wider foldover elastic, here applied with a regular old zigzag.


Inside out, showing the Powerstretch inner bra:


And inside out, from the back. Straps are simply zigzagged into place, but you could use lingerie rings and sliders to make the straps adjustable. When I can avoid that, I like to. Less hardware, less adjusting down the road. But I did just buy a pack of 25 clear rings and sliders in the 5/8" size on eBay for $7.50 (so, so much less expensive than at Hancock's or Joann's).


And, the fanciest-looking variation, another View B takeoff:


The rings make the straps look adjustable, but the truth is I made them too short the first time around, and then had to improvise a fix. This thicker FOE wouldn't go through the lingerie sliders, so the rings are just for decoration.

Even though this variation looks a little complicated, it's simple to do. Instead of enclosing the front edge binding in the armhole binding, extend the neck binding for 20" or so on each side. You can reinforce the spot where the two bindings meet with a little zigzag tack if you want. I haven't done that yet, but I will if the area starts to show signs of strain.


So many more variations are possible!

On a different note, check out this amazing deal on eBay for Patagonia sports bras for $5 each. I got two and I really, really like them. Very comfortable and the construction quality far exceeds what I can produce with my domestic equipment. I will be buying at least four more for wearing every day. These are, as I understand, military surplus. That means they are only available in sizes M and (in some other auctions I saw) L. The color is...I don't know...beigeish, greenish drab. It's not a color I would wear on its own, even in hot yoga class. But for the price and the workmanship, I love it!


Vogue 8876 Mixed Media/Mixed Emotions

$
0
0

Marcy Tilton's Vogue 8876, nominally a dress pattern, has been on my list to make for a good while. This jacket version was very much inspired by The Dashing Eccentric's version and by Marcy Tilton's discussion of using the dress pattern to make a vest.


My reaction to the style and construction is positive, to the specific outcome I've achieved here is ambivalent. Among other quibbles, these photos reinforce my conviction that the plaid hem binding has got to go!

What I love, number one: the organic cotton sweatshirt fleece fabric, purchased here in Asheville at a warehouse sale from Spiritex, but I believe this is the same fabric available by the yard from Organic Cotton Plus. I linked to the navy blue color, as they don't seem to have black in stock. I would love to get some navy.

I made a long sweatshirt out of this fabric in the early winter and I bet I have worn it at least 50% of all the days since then. It is just heavenly: soft, breathable, warm without making me sweat, beefy and non-clinging. The fabric also washes very well. It has almost no stretch, so I thought of making a casual jacket with a little extra "something" to make it special.

Finding organic, comfortable, durable fabrics is not easy. Finding them in exactly the color or print you want can be flat-out impossible. If I want to use these fabrics, I need to find a way to embellish or manipulate them. Plain black isn't my best color, so I tried to think of how I could incorporate another color, preferably brown or rust, into the piece. Color blocking is a "no" for me--too harsh.

So I tried bleach dyeing. Following instructions from various pins on Pinterest, I laid a lace curtain over a cut yard of the fabric and sprayed it with a 50/50 mixture of bleach and water. Unfortunately my spray bottle was very dribbly, so my results weren't as precise as they might have been, but I was satisfied with an abstract outcome. I love the color bleach on black produces.


The bleach dyeing process is fast, too: I pretty much finished spraying, let the piece sit for just one or two minutes, and then put it straight into the washing machine. It's important to rinse the bleach out immediately, unless you actually want it to make holes in your fabric.

What I love, number two: the shape of the neckline and collar. Could this be more perfect for ladies of, cough, a certain age? The long, narrow oval is so flattering, especially once the stand-up collar has been added. Unlike so many higher collars, this one stands away from the neck enough to not irritate the skin on my jaw. I used a contrasting cotton for the inner collar, since it seemed that two layers of thick sweatshirting would be too bulky. Despite my concerns about bulk, I did use lightweight interfacing on the lower collar, and I am glad I did.


Virginia's rule of thumb on interfacing: if you are asking yourself, "Should I use interfacing here?", the answer should almost certainly be yes.

What I like: the topstitching and zipper details. Good job, self.

What I am unsure about: the length and proportions.

What I don't like, number one: the amount of fullness in the lower part of the jacket. It is just too much in this bulky fabric. I may go back and stitch the back pleat all the way down to the hem to pull it in. I'll baste it in first to test.


What I don't like, number two: my oversight in not realizing that these sleeves are intended to be bracelet length. I added a bit of length in cutting, but not enough to turn up a hem and still have a full length sleeve. Now I'm not sure how I want to finish that edge: not at all? serged hem? add a cuff? Also, I added some volume to the sleeve cap to make a gathered sleeve, but I didn't add enough. The gathers lack oomph. So I need to remove the upper parts of the sleeves and reduce the sleeve cap height, and then reinsert the sleeves.

What I hate: that hem binding, which I thought would look so sharp and cool, but which is too much of a contrast and just generally wrong.

I still have some work to do here, but I wanted to show you the jacket in its unperfected state. Experience has shown that, if an item is not blogged soon after its making, it is unlikely ever to be blogged at all. My clothes live a hard life, full of Great Pyrenees hair, sweaty dancing and perfunctory laundry practices. Once they are in the regular rotation, they don't look pristine for long!

Vogue 8876 Renovation + Wardrobe Contest

$
0
0
First things first: inspired by your comments and good ideas, I made some changes to my Vogue 8876 sweater jacket from my last post. While I feel better in the 2.0 version, I'm not sure the resulting garment will be quite the wardrobe workhorse I had originally envisioned because:


I removed the sleeves and made it into a vest.

Usually, when I am chilly enough to need a vest, I am chilly enough to also want an extra layer on my arms. The adage "if your torso is warm, your whole body will be warm" isn't true for me. I decided in this case, however, to do what I thought would have a better chance of producing a successful garment rather than what suits my usual functional requirements.


In addition to removing the sleeves, I picked off the bias trim at the hem and shortened the length slightly, and I reduced the volume of the lower part of the garment by a whopping 12"! The reduction in fullness was achieved by sewing both the front and the back pleats closed through the hemline and by taking in the side seams by 4" per side. I could still hide an early pregnancy under there, though I certainly don't plan to. Now the piece looks roomy rather than completely overwhelming.

So, that's the update on the Vogue 8876 front. On to new business.

I sewed up a very simple pair of pants (worn in the photos above) on Saturday. Any elastic waist pants pattern would have done the trick, except for my TNT (tried 'n true) elastic waist pants pattern, which has mysteriously become less billowy recently. I can't imagine what could have caused that to happen...

In any event, I used Butterick 5203, size 14, shortened on all the petite lines plus an extra 1 1/2" at the top of the waistband (otherwise I think the waist would have reached nearly to the bottom of my bra band) and an extra 4" at the hem (to make the cropped length). I've had such rotten results with pants of late that I decided to skip adding pockets or any other details--expending only the absolute minimum effort necessary to test the pattern and, as it turns out, end up with a wearable garment.

The fabric is a black rayon challis from FabricMart. It was on sale and inexpensive but it feels fantastically light and cool, and the nice drape makes it as flattering as a loose-fitting, elastic-waist pant is going to be. At the lower edge, I turned up a 1 1/8" casing and inserted 1" elastic to make a sporty gathered cuff.

This picture is so much like the others! My husband has limited patience for this sort of thing.
The top underneath is Butterick 5954.

It was only after I finished up these oh-so-basic pants that I realized a new Pattern Review Wardrobe contest started on April 1. Whether or not I will actually enter the contest, I decided to sew along with the concept: a full capsule wardrobe of nine pieces that work together.

The contest wardrobe consists of:

  • Four tops
  • Three bottoms
  • Two items of the sewer's choosing (could be a dress, a jacket, a cardigan--whatever)
I have so many new motivations for wanting to sew a different kind of clothing just now! For one thing, I have become entranced with the work of Katy Bowman, a biomechanist and author whose basic message is that we need a whole lot more movement in our lives. An hour of exercise per day, no matter how intense, is not enough to maintain a healthy human structure and biology. As startling and unrealistic as this idea seems at first, after reading Katy's work for a while, I am starting to see how I might be able to incorporate her suggestions for adding more movement to my day while still getting life done. But pretty, whimsical dresses are not exactly the ticket when one wants to alternate between walking, standing, sitting on the floor, stretching and hanging from a bar throughout the day. I need movement-friendly clothing! And I want it to be compatible with comfortable, not-very-restrictive bras and minimal/barefoot shoes.

Second, I am taking on a new "job" supporting business development and marketing for my husband's new architecture practice. Since my former professional networking wardrobe is ten years old, too small and too stuffy for Asheville in any event, I need new versatile pieces that work in a casual business and community environment.

More movement or not, my size and shape are changing in the second half of my forties. I vow to fight on, but today's reality is a more middle-aged form! This translates into a need for a shift in my ideas about the kinds of clothing shapes that flatter me. 

Finally, I feel ready for a change. I am really excited about trying some new things. And I definitely need some new basics in my closet--most of my every day items are overdue for replacement.

That all adds up to excitement for the Wardrobe Contest. I also finished two new (very basic tops) over the weekend, which I will show you soon.

What do you think of the contest? Can I convince you to join in, officially or unofficially?


Latest Images